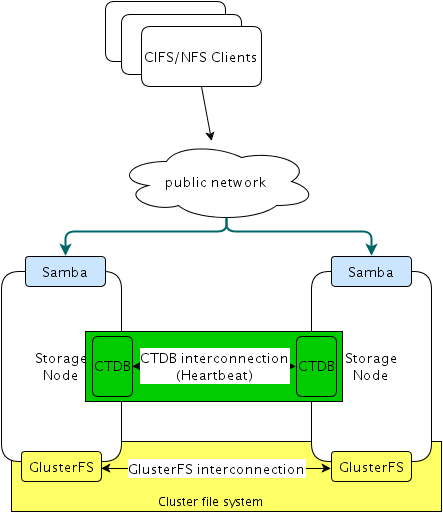
1. Architecture
1.1 Prerequisite and Foundation
- CentOS 6.x
- GlusterFS
- CTDB
- Samba
| 縮寫 | 全名 | 說明 |
|---|---|---|
| CIFS | Common Internet File System | 簡單地說, Windows的網路上的芳鄰, 網路文件共享系統(CIFS) |
| NFS | Network File System | |
| PV | Physical Volume | |
| VG | Volume Group | |
| LV | Logical Volume |
1.2 網路配置
準備兩台機器, 各有三張網路卡介面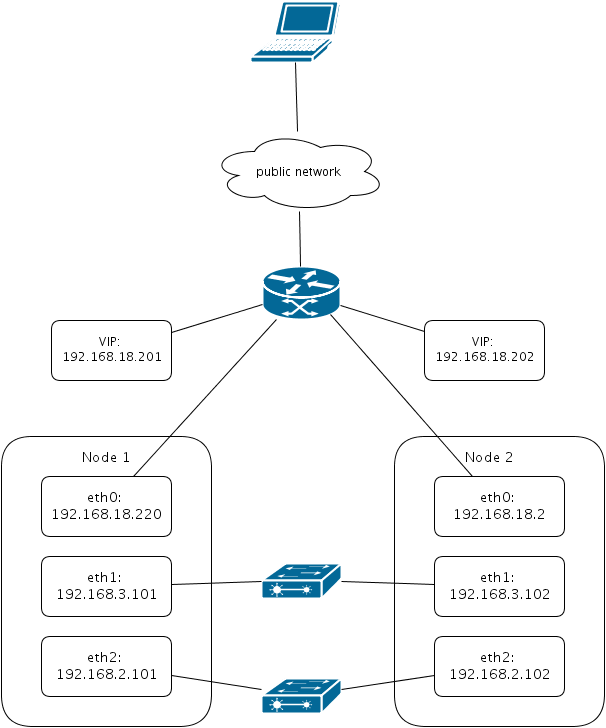
Add the following hostnames in /etc/hosts
# NFS/CIFS access
192.168.18.220  nas1.rickpc gluster01
192.168.18.2  nas2.rickpc gluster02

# CTDB interconnect
192.168.3.101    gluster01c
192.168.3.102    gluster02c

# GlusterFS interconnect
192.168.2.101    gluster01g
192.168.2.102    gluster02g
1.3. 建立實體硬碟
若要瞭解Linux磁碟檔案系統的基本原理和如何使用fdisk來分切磁碟可參考 NFS伺服器1介紹, 以下僅列出基本指令Prepare phylical partition to create /dev/sdb1
$ fdisk /dev/sdb
$ partprobe筆者所使用的硬碟為8G, 但只切出
/dev/sdb4 64M
/dev/sdb5 2.1G (將做為physical volume空間)
Disk /dev/sdb: 8589 MB, 8589934592 bytes
255 heads, 63 sectors/track, 1044 cylinders
Units = cylinders of 16065 * 512 = 8225280 bytes
Sector size (logical/physical): 512 bytes / 512 bytes
I/O size (minimum/optimal): 512 bytes / 512 bytes
Disk identifier: 0x9815603c

   Device Boot      Start         End      Blocks   Id  System
/dev/sdb1               9        1044     8321670    5  Extended
/dev/sdb4               1           8       64228+  83  Linux
/dev/sdb5               9         270     2104483+  83  Linux
1.4. 建立Linux Volume
若對於PV, VG, LV的概念原理想深入瞭解的話, 可參考 Logical Volume Manager2的解釋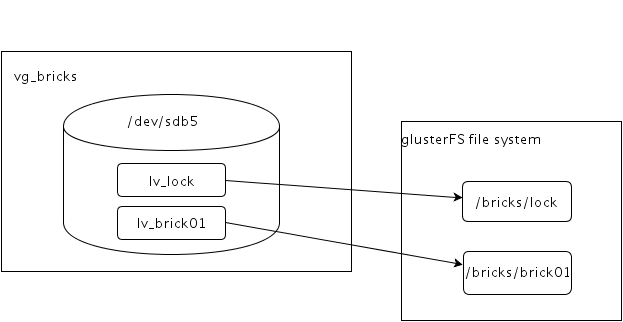
Create phylical volume
$ pvcreate /dev/sdb5$ vgcreate vg_bricks /dev/sdb5$ lvcreate -n lv_lock -L 64M vg_bricks
$ lvcreate -n lv_brick01 -L 1.5G vg_bricks$ yum install -y xfsprogs$ mkfs.xfs -i size=512 /dev/vg_bricks/lv_lock
$ mkfs.xfs -i size=512 /dev/vg_bricks/lv_brick01
$ echo '/dev/vg_bricks/lv_lock /bricks/lock xfs defaults 0 0' >> /etc/fstab
$ echo '/dev/vg_bricks/lv_brick01 /bricks/brick01 xfs defaults 0 0' >> /etc/fstab
$ mkdir -p /bricks/lock
$ mkdir -p /bricks/brick01
$ mount /bricks/lock
$ mount /bricks/brick01[root@nas1 ~]# lvdisplay
--- Logical volume ---
LV Path /dev/vg_bricks/lv_lock
LV Name lv_lock
VG Name vg_bricks
LV UUID rnRNbZ-QFun-pxvS-AS3f-pvn3-dvCY-h3qXgi
LV Write Access read/write
LV Creation host, time nas1.rickpc, 2014-07-04 16:54:20 +0800
LV Status available
# open 1
LV Size 64.00 MiB
Current LE 16
Segments 1
Allocation inherit
Read ahead sectors auto
- currently set to 256
Block device 253:2
--- Logical volume ---
LV Path /dev/vg_bricks/lv_brick01
LV Name lv_brick01
VG Name vg_bricks
LV UUID BwMD2T-YOJi-spM4-aarC-3Yyj-Jfe2-nsecIJ
LV Write Access read/write
LV Creation host, time nas1.rickpc, 2014-07-04 16:56:11 +0800
LV Status available
# open 1
LV Size 1.50 GiB
Current LE 384
Segments 1
Allocation inherit
Read ahead sectors auto
- currently set to 256
Block device 253:31.5. 安裝GlusterFS and create volumes
想瞭解CTDB與GlusterFS之間是如何運作以及如何安裝GlusterFS和CTDB, 可參考 GlusterFS/CTDB Integration3 和 Clustered NAS For Everyone Clustering Samba With CTDB4.Install GlusterFS packages on all nodes
$ wget -nc http://download.gluster.org/pub/gluster/glusterfs/3.5/LATEST/RHEL/glusterfs-epel.repo -O /etc/yum.repos.d/glusterfs-epel.repo
$ yum install -y rpcbind glusterfs-server
$ chkconfig rpcbind on
$ service rpcbind restart
$ service glusterd restartConfigure cluster and create volumes from gluster01
將 gluster02g 加入可信任的儲存池 (Trusted Stroage Pool)
$ gluster peer probe gluster02g確認信任關係
gluster peer status
建立 Volume: 在 glusterfs 的架構中,每一個 volume 就代表了單獨的虛擬檔案系統。
# transport tcp
$ gluster volume create lockvol replica 2 gluster01g:/bricks/lock gluster02g:/bricks/lock force
$ gluster volume create vol01 replica 2 gluster01g:/bricks/brick01 gluster02g:/bricks/brick01 force
$ gluster vol start lockvol
$ gluster vol start vol01/dev/mapper/vg_bricks-lv_lock
60736 3576 57160 6% /bricks/lock
/dev/mapper/vg_bricks-lv_brick01
1562624 179536 1383088 12% /bricks/brick01
localhost:/lockvol 60672 3584 57088 6% /gluster/lock
localhost:/vol01 1562624 179584 1383040 12% /gluster/vol011.6. Install and configure Samba/CTDB
Install Samba/CTDB packages6 on all nodes with samba-3.6.9, samba-client-3.6.9 and ctdb-1.0.114.5$ yum install -y samba sambaclient ctdb$ yum install -y rpcbind nfs-utils
$ chkconfig rpcbind on
$ service rpcbind start$ mkdir -p /gluster/lock
$ mount -t glusterfs localhost:/lockvol /gluster/lockCTDB_PUBLIC_ADDRESSES=/gluster/lock/public_addresses
CTDB_NODES=/etc/ctdb/nodes
# Only when using Samba. Unnecessary for NFS.
CTDB_MANAGES_SAMBA=yes
# some tunables
CTDB_SET_DeterministicIPs=1
CTDB_SET_RecoveryBanPeriod=120
CTDB_SET_KeepaliveInterval=5
CTDB_SET_KeepaliveLimit=5
CTDB_SET_MonitorInterval=15192.168.3.101
192.168.3.102192.168.18.201/24 eth0
192.168.18.202/24 eth0[global]
workgroup = MYGROUP
server string = Samba Server Version %v
clustering = yes
security = user
passdb backend = tdbsam
[share]
comment = Shared Directories
path = /gluster/vol01
browseable = yes
writable = yes$ mv /etc/sysconfig/ctdb /etc/sysconfig/ctdb.orig
$ mv /etc/samba/smb.conf /etc/samba/smb.conf.orig
$ ln -s /gluster/lock/ctdb /etc/sysconfig/ctdb
$ ln -s /gluster/lock/nodes /etc/ctdb/nodes
$ ln -s /gluster/lock/public_addresses /etc/ctdb/public_addresses
$ ln -s /gluster/lock/smb.conf /etc/samba/smb.conf$ yum install -y policycoreutils-python
$ semanage permissive -a smbd_tCreate the following script for start/stop services in /usr/local/bin/ctdb_manage
#!/bin/sh
function runcmd {
        echo exec on all nodes: $@
        ssh gluster01 $@ &
        ssh gluster02 $@ &
        wait
}
case $1 in
    start)
        runcmd service glusterd start
        sleep 1
        runcmd mkdir -p /gluster/lock
        runcmd mount  -t glusterfs localhost:/lockvol /gluster/lock
        runcmd mkdir -p /gluster/vol01
        runcmd mount  -t glusterfs localhost:/vol01 /gluster/vol01
        runcmd service ctdb start
        ;;

    stop)
        runcmd service ctdb stop
        runcmd umount /gluster/lock
        runcmd umount /gluster/vol01
        runcmd service glusterd stop
        runcmd pkill glusterfs
        ;;
esac
1.7. Start services
Set samba password and check shared directories via one of floating IP's.$ pdbedit -a -u root$ smbclient -L 192.168.18.201 -U root
$ smbclient -L 192.168.18.202 -U root$ ssh gluster01 netstat -aT | grep microsoft2. Testing your clustered Samba
2.1. Client Disconnection
在一台Windows的PC上, 設定Z槽的網路磁碟機, 並執行下述的run_client.batecho off
:LOOP
echo "%time% (^_-) Writing on file in the shared folder...."
echo %time% >> z:/wintest.txt
sleep 2
echo "%time% (-_^) Writing on file in the shared folder...."
echo %time% >> z:/wintest.txt
sleep 2- 執行run_client.bat
- 將Windows上的網路卡介面關閉, 程式無法把資料寫入cluster file system
- 重新啟動網路卡介面, 程式又在很短時間內寫入cluster file system
2.2. CTDB Failover
使用ctdb status和ctdb ip查看目前cluster file system的狀態 測試步驟:- 在Windows PC上執行run_client.bat
- 在任一台Cluster node上, 關閉ctdb, 指令如下:
[root@nas2 ~]# ctdb stop- 觀察PC上的timestamp正常寫入cluster file system
2.3. Cluster Node Crash
將一台Cluster node reboot, 觀察Windows PC上的連線狀況 測試步驟:- 在Windows PC上執行run_client.bat
- 將任一台Cluster node OS shutdown
- 觀察PC上的timestamp的變化
"12:16:49.59 (-_^) Writing on file in the shared folder...."
"12:16:51.62 (^_-) Writing on file in the shared folder...."
"12:16:53.66 (-_^) Writing on file in the shared folder...."
"12:16:55.70 (^_-) Writing on file in the shared folder...."
"12:16:57.74 (-_^) Writing on file in the shared folder...."
"12:17:41.90 (^_-) Writing on file in the shared folder...."
"12:17:43.92 (-_^) Writing on file in the shared folder...."
"12:17:45.95 (^_-) Writing on file in the shared folder...."
"12:17:48.00 (-_^) Writing on file in the shared folder...."
"12:17:41.90 (^_-) Writing on file in the shared folder...."
紅色兩行的結果, 發現Winodws的連線會有數秒的中斷, 但在數秒後, PC上的test program將重新連上, 符合HA-level recovery
2.4. Ping_pong for CTDB lock rate
Ping_pong8是Samba open source所提供的一個小工具, 用來測量CTDB的lock rate筆者稍微修改原程式碼, 並加入了將lock rate寫入到Graphite9, 方便長時間觀察lock rate的變化
ping_pong.socket.c
source code
3. Reference
- Linux 磁碟與檔案系統管理, 鳥哥↩
- 邏輯捲軸管理員 (Logical Volume Manager), 鳥哥↩
- GlusterFS/CTDB Integration, Etsuji Nakai↩
- Clustered NAS For Everyone Clustering Samba With CTDB, Michael Adam↩
- gluster peer probe: failed: Probe returned with unknown errno 107, Network Administrator Blog↩
- SAMBA 伺服器, 鳥哥↩
- NFS 伺服器, 鳥哥↩
- Ping pong, Samba↩
- Graphite - Scalable Realtime Graphing↩
沒有留言:
張貼留言